Hosting Your Blog On AWS
Few days ago, I was finally able to try out AWS and actually host my blog successfully with https. It took a lot more time than planned but I was able to learn about various services of AWS such as S3, CloudFront, IAM, ACM, and Route53. I know it looks like a lot of services to host a single static website, but they all have their own specific purposes and this is a guide that I am writing so that no one has to go through hours of googling but me. I usually write short 3 ~ 4 minute posts, but I think this one might be one of the longest ones yet.
Before I begin, I want to let you know that I am not an expert in this area, but I am very interested in networking and I have read and followed those who are experts. So, if I miss something, please let me know. Now, let’s start.
Requirements
Before you jump onto this tutorial, I recommend that you have the followings ready:
- A static website
- A domain name (would be better if registered on AWS)
- AWS Command Line Interface (cli)
An IAM account is optional but I think it would add a nice layer of security to your AWS account. The AWS cli is useful for creating deployment scripts which will automatically send your static website to AWS. When you have the cli configured, let’s move on to the next steps.
Uploading your static website
The very first thing to do is to upload your static website to AWS so that other AWS services can access it as well. In order to do this, we will have to create a Bucket from the S3 service using the AWS console.
To create a Bucket, you’ll have to go to the S3 service page. From there,
- Click on the
Create bucket - Enter your bucket name in a url form (ex: example.com, blog.example.net)
- Select the region of your choice and click next
- You can enable versioning learn more
- Click on next
- You must un-check the
Block all public accessso that your resources (a.k.a your website) can be visible to the public. Since you allowed public access, please do not upload any sensitive information. Anyone can see it! - Click on next and finish it by clicking on
Create bucket
Voila!
You just created your first bucket. However, we are just getting started. The bucket needs to be configured for static website hosting. I recommend that you read this and follow through the steps to ready your bucket to host a static website.
Now that the bucket is ready, let’s upload the static website to the bucket. In order to do this we will use the AWS cli. Open up your terminal and cd into the project root directory where you have your static website. Assuming that your static website is in a directory called _site and your bucket name as example.com, the following command will synchronize S3 with your specified files.
aws s3 sync _site s3://example.com
By default, AWS cli will use your default credentials that you have provided during cli configuration to upload the files to S3. If you have a different account, you can specify it by adding the option.
aws s3 sync _site s3://example.com --profile johndoe
After the files have been uploaded, check it in the console page to see if the files are actually there and also test your endpoint url. Your endpoint url should be specified in the properties tab which looks something like this:
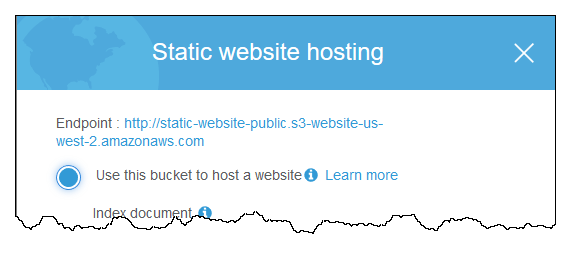
Image from the AWS guide.
Connecting your website to your domain name
Now that the static website is on the internet and available to the public, we should be able to connect our domain name and be done, but not yet. We can connect our domain using Route 53 to our bucket and use it. However, there is one thing we missed: HTTPS.
Connecting to Route 53 and calling it a day will leave your website with HTTP, which is not secure at all as anyone can tap in to your packets to see the contents, host, ip addresses and probably more. To encrypt those packets, we need to use HTTPS to communicate. Although this is just a blog, we can use this opportunity to learn new things!
In order to setup HTTPS, we need an SSL/TLS certificate. An SSL/TLS certificate is used to encrypt your data that is transmitted across the web. AWS also provides a service to provide public SSL certificates for free called ACM. By getting our certificate through AWS, it will take care of renewal of certificates.

At the time of writing this post, you must create the certificate in Virginia to make it work with CloudFront which I will explain later.
I highly recommend that you follow this post to create a free public certificate.
With the certificate ready and verified with your method of choice, let’s move on to distributing our resource (website) using that certificate.
Using a CDN to serve your website fast and secure
What is a Content Delivery Network? That is a question which Wiki will answer. My understanding is that it is a bunch of big and small servers around the world to serve contents faster by being physically closer to whoever is requesting.
Amazon provides a CDN service called CloudFront which also has the option to support HTTPS with your public certificate. I would love to just drop the link to the official guide on how to connect your bucket and the public certificate to a CloudFront distribution, but there is something that the guide is missing. So, let’s do this together!
First, go to the CloudFront service dashboard.
Click on the blue Create Distribution button to create our CloudFront distribution.
Since we want a web distribution, click on Get Started for web.
For the Origin Domain Name, once you click on the input field, you should be able to see your S3 bucket as an option.
Select the bucket, and doing so will autofill most of what we need.
You can read more about each option by clicking the information icon.
I highly recommend reading about all of the options as it can also affect the pricing.
Next, under Distribution Settings, the option to choose Custom SSL Certificate should be available.
Choose your public certificate from earlier.
Sometimes, it takes several hours after validation of your public certificate for this option to be enabled.
So, don’t panic like me and wander off to google just to end up with the same result.
With the SSL certificate set, make sure that the distribution state is enabled and click on Create Distribution.
Now that the distribution is ready and up, we can finally connect our domain name to our CloudFront distribution.
Connecting your website to your domain name (For Real)
Go to the Route53 AWS service and into your hosted zone. In order to connect your domain to CloudFront,
- Create a new record set by clicking on
Create Record Set - For the name, enter the url that exactly matches the S3 bucket name
- Set
AliasasYes - If you have entered the matching url, once you click on
Alias Target, you should be able to see your CloudFront distribution - Select the distribution and click
Create
Finally, after all those services, we have our website ready.
![]()
Your website is ready, but you will probably see something like Access Denied or some error when you go to your website. If not and if you think your website is pretty and ready, you can rest and feel proud of yourself. If you the errors persist after a few hours, welcome to Part 2 of this post.
The problem you are facing is probably due to the URL. The downside of using a CDN is that it tries to fetch exactly what the user has requested.
For example, if I enter the URL:
example.com
I expect to see the contents of
example.com/index.html
When you use the host static website option with S3 and just connect to a domain name, this is taken care of.
However, when CloudFront steps in, it will try to go for exactly what the user has asked.
So, if you try your website with /index.html, it should show the contents that you wanted.
If it doesn’t, it is time for you to go to google and I wish you the best.
To solve this problem, the incoming requests should be modified so that if the target url is a directory, it should try to lead them to the index.html in that directory instead.
This can be solved using a service called Lambda@Edge
*edit: per my recent post, I recommend using Cloudfront Functions instead of Lambda for this use case
Again, I recommend going through this post to configure Lambda@Edge for your CloudFront distribution so that the index.html in subdirectories can be shown to the user.
Conclusion and the Pricing
This was my first time using AWS, but I previously used Heroku or Netlify to host applications. The main difference about the two groups is that AWS gives me more freedom in the configuration while the others handle it for me.
Also, the price is significantly cheaper compared to other services, but one must always keep watch on the usage as it can get expensive quick. So far, I am only paying 50 cents per month for my blog due to Route 53 and $12 per year for my domain that I have registered on AWS. However, the price may differ depending on your settings so I highly recommend you read the pricing pages. Here’s the link to the free-tier AWS services.
For my blog, I used multiple services to host a static website. My plan is to use computational servers to run backend programs and it is already in development :)
I hope to use EC2 and load balancers to efficiently handle my APIs for the next project.
As a side note, I couldn’t use Amplify as the ruby version was not compatible for my Jekyll application. So, I decided to use all the other services such as CloudFront and ACM. It was a long way around, but I was able to learn more about how AWS works and it was a good experience to try various services.