Arduino TV Remote
Few days ago, I needed a second monitor. I decided to use the LG TV that has been in the house since the day my family moved in. However, the remote was missing and the touch button was broken. After giving it some thought, I decided to make a remote control myself. I think it would have been simpler if I just fixed the buttons, but we make dumb choices 🤷.
Modules
The modules used in this project is as follows:
- IR transmitter
- 3 push-buttons (power, confirm, settings)
- joystick (for navigating)
The library used for sending IR signals is IRremote.
Circuit and Photos
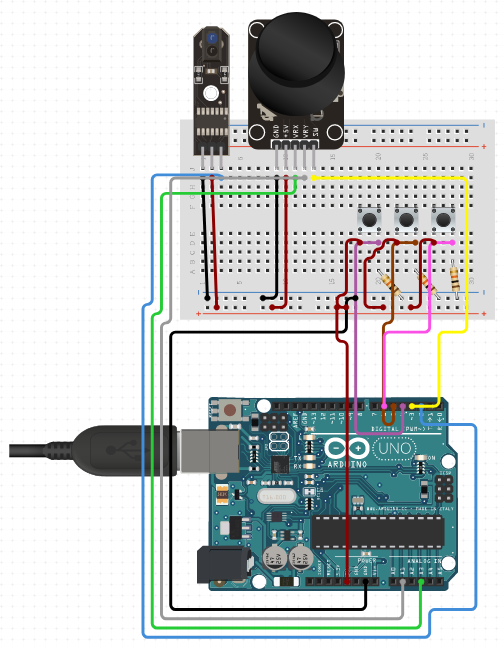
The program used for making the circuit is Circuit.io. It doesn’t have that many default modules to play with, but it is a web application and also free (which is very convenient).
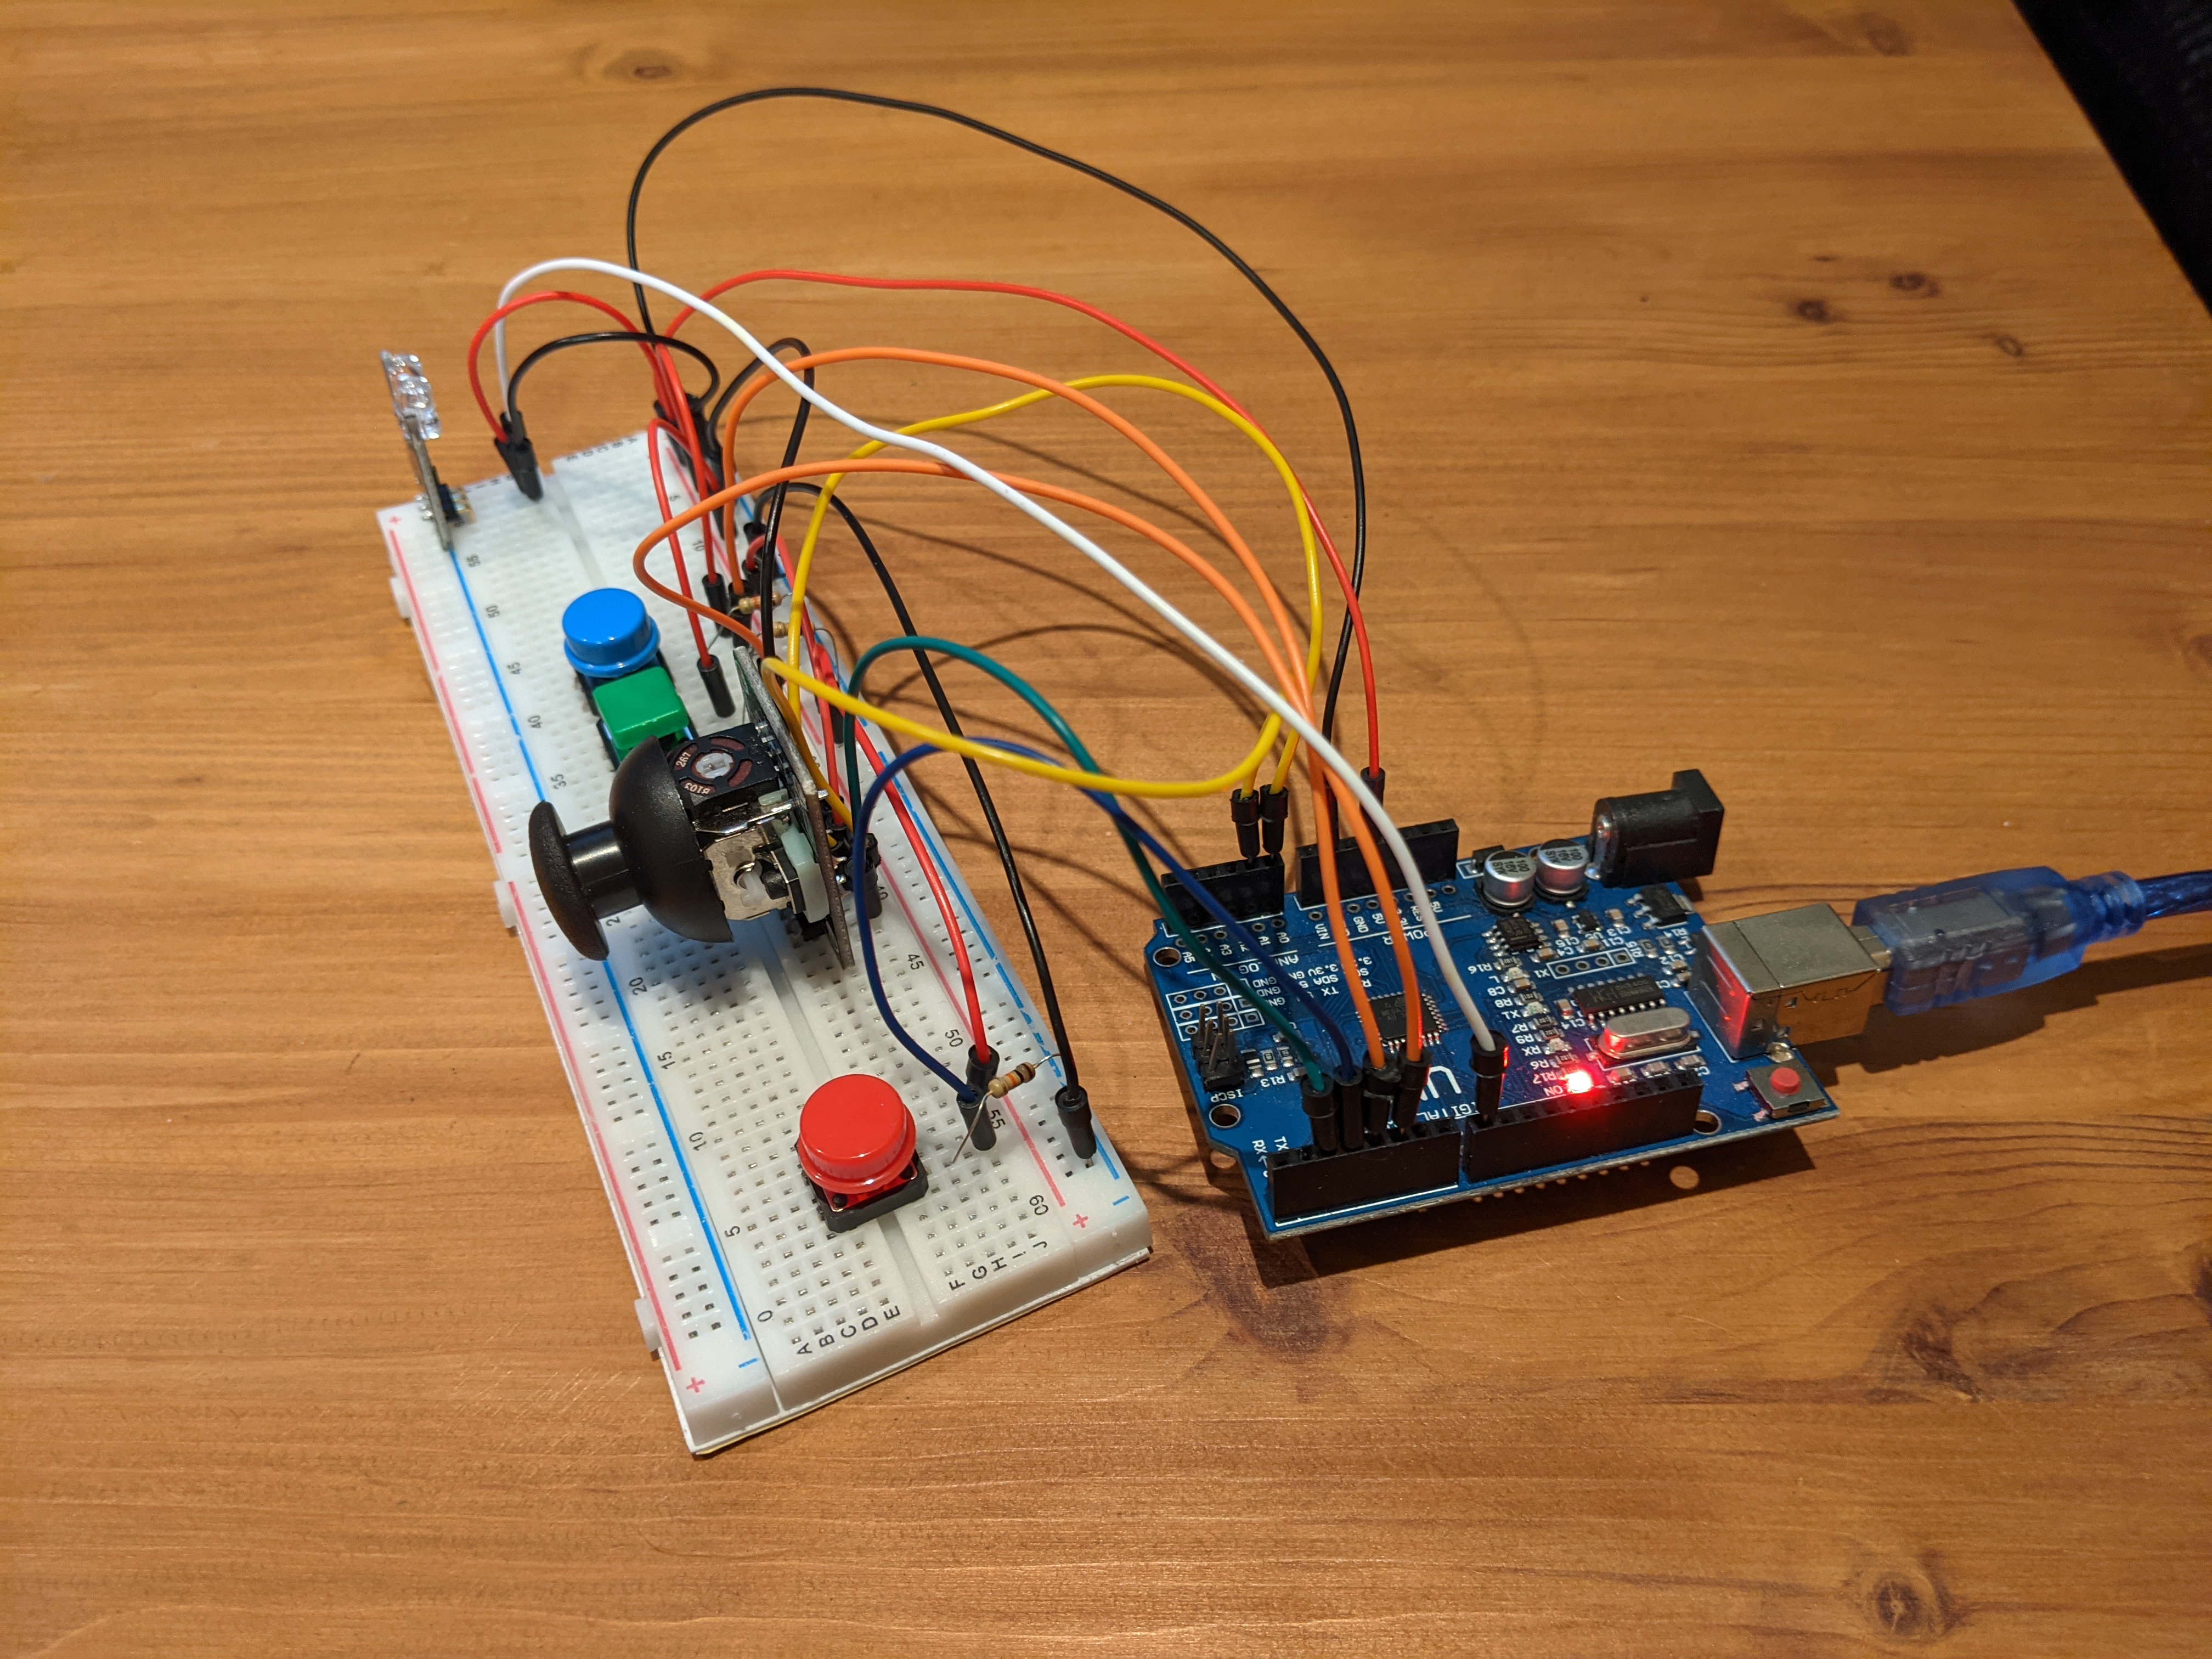
The cables are spaghetti, but it works!
Code
Let’s go through the codes line by line. (also for the future me when I decide to come back to it)
// IR
// LG has data bits similar to NEC but in reverse (Most Significant Bit first)
#define IR_SEND_PIN 8
#include <IRremote.h>
IRData IRSendData;

// Joystick
#define JOY_X A0
#define JOY_Y A1
enum dir { CENTER = -1, UP = 0x20DF02FD, DOWN = 0x20DF827D, LEFT = 0x20DFE01F, RIGHT = 0x20DF609F };
dir current;

// Power Button
#define POWER_BUTTON 3
#define POWER_CMD 0x20DF10EF

// Settings Button
#define SETTINGS_BUTTON 4
#define SETTINGS_CMD 0x20DFC23D

// Confirm Button
#define CONFIRM_BUTTON 5
#define CONFIRM_CMD 0x20DF22DD

// Function to read the direction of the joystick based on x and y values
void readJoystick() {
  int x = analogRead(JOY_X);
  int y = analogRead(JOY_Y);

  dir temp = NULL;
  // The module is in 10 bit for x and y
  if (x < 600 && x > 400 && y == 0) {
    temp = LEFT;
  }
  if (x < 600 && x > 400 && y == 1023) {
    temp = RIGHT;
  }
  if (x == 0 && y < 600 && y > 400) {
    temp = DOWN;
  }
  if (x == 1023 && y < 600 && y > 400) {
    temp = UP;
  }
  if (x < 600 && x > 400 && y < 600 && y > 400) {
    temp = CENTER;
  }

  // Only update value when change has occurred
  if (temp && temp != current) {
    current = temp;

    // Send all signals except for center as center is default
    // This allows sending the same signal in sequence
    if (current != CENTER) {
      IrSender.sendNECMSB(current, 32, false);
      delay(110);
    }
  }
}

// Function to read from multiple (power, settings, confirm) push-buttons
void readPushButton() {
  if (digitalRead(POWER_BUTTON) == HIGH) {
    IrSender.sendNECMSB(POWER_CMD, 32, false);
    delay(110);
  }

  if (digitalRead(SETTINGS_BUTTON) == HIGH) {
    IrSender.sendNECMSB(SETTINGS_CMD, 32, false);
    delay(110);
  }

  if (digitalRead(CONFIRM_BUTTON) == HIGH) {
    IrSender.sendNECMSB(CONFIRM_CMD, 32, false);
    delay(110);
  }
}

void setup() {
  Serial.begin(9600);
  pinMode(POWER_BUTTON, INPUT);
  pinMode(CONFIRM_BUTTON, INPUT);
  pinMode(SETTINGS_BUTTON, INPUT);
  IrSender.begin(IR_SEND_PIN, ENABLE_LED_FEEDBACK);
  delay(1000);
}

void loop() {
  // Joystick input
  readJoystick();

  // PushButton input
  readPushButton();
}
Put it simple, initialization for the push buttons and the IR transmitter is done in the setup, and loop is constantly waiting for user input.
The user can use the three buttons to turn on/off the monitor, open the settings menu, and confirm.
In addition, the user can navigate through the menu screen using the joystick.
Starting from the beginning,
// IR
// LG has data bits similar to NEC but in reverse (Most Significant Bit first)
#define IR_SEND_PIN 8
#include <IRremote.h>
IRData IRSendData;
This part is getting the IR library and declaring the variables necessary for sending the IR signals. As stated in the comments, LG has a similar protocol to NEC. Although it’s a post from 2017, LG’s IR protocol has a total of 32 bits for data which is divided into four 8 bits. The first part is called the Low Custom and the second part is the same but inverted. The next two parts are also similar, but are labeled as Command. The protocol that I have just explained is very similar to NEC.

Since the code for sending in NEC protocol sends it LSB first, I used the MSB first method. (which is the LG way)
// Joystick
#define JOY_X A0
#define JOY_Y A1
enum dir { CENTER = -1, UP = 0x20DF02FD, DOWN = 0x20DF827D, LEFT = 0x20DFE01F, RIGHT = 0x20DF609F };
dir current;

// Power Button
#define POWER_BUTTON 3
#define POWER_CMD 0x20DF10EF

// Settings Button
#define SETTINGS_BUTTON 4
#define SETTINGS_CMD 0x20DFC23D

// Confirm Button
#define CONFIRM_BUTTON 5
#define CONFIRM_CMD 0x20DF22DD
Here, the variables (such as pin and command) related to the buttons and joystick used for user input is initialized.
// Function to read the direction of the joystick based on x and y values
void readJoystick() {
  int x = analogRead(JOY_X);
  int y = analogRead(JOY_Y);

  dir temp = NULL;
  // The module is in 10 bit for x and y
  if (x < 600 && x > 400 && y == 0) {
    temp = LEFT;
  }
  if (x < 600 && x > 400 && y == 1023) {
    temp = RIGHT;
  }
  if (x == 0 && y < 600 && y > 400) {
    temp = DOWN;
  }
  if (x == 1023 && y < 600 && y > 400) {
    temp = UP;
  }
  if (x < 600 && x > 400 && y < 600 && y > 400) {
    temp = CENTER;
  }

  // Only update value when change has occurred
  if (temp && temp != current) {
    current = temp;

    // Send all signals except for center as center is default
    // This allows sending the same signal in sequence
    if (current != CENTER) {
      IrSender.sendNECMSB(current, 32, false);
      delay(110);
    }
  }
}
This is the function for reading joystick input where x and y values are used to decide the direction. I think this part could have been coded better.
// Function to read from multiple (power, settings, confirm) push-buttons
void readPushButton() {
  if (digitalRead(POWER_BUTTON) == HIGH) {
    IrSender.sendNECMSB(POWER_CMD, 32, false);
    delay(110);
  }

  if (digitalRead(SETTINGS_BUTTON) == HIGH) {
    IrSender.sendNECMSB(SETTINGS_CMD, 32, false);
    delay(110);
  }

  if (digitalRead(CONFIRM_BUTTON) == HIGH) {
    IrSender.sendNECMSB(CONFIRM_CMD, 32, false);
    delay(110);
  }
}
Same as the function for the joystick, this is the function for the push buttons.
On push, IrSender.sendNECMSB() is called which is the function for sending the MSB first.
void setup() {
  Serial.begin(9600);
  pinMode(POWER_BUTTON, INPUT);
  pinMode(CONFIRM_BUTTON, INPUT);
  pinMode(SETTINGS_BUTTON, INPUT);
  IrSender.begin(IR_SEND_PIN, ENABLE_LED_FEEDBACK);
  delay(1000);
}

void loop() {
  // Joystick input
  readJoystick();

  // PushButton input
  readPushButton();
}
This last part quite summarizes the whole code in one page. Here, the buttons and the IR module are initialized and awaits for user input to send.
Conclusion
The project started rather unexpectedly, but it was a great opportunity to actually use and learn IR protocols. In the beginning, I barely knew the difference between RF and IR, but after many trial-and-errors and the useful resources on the net, I was able to fix the problem with the monitor and successfully create a fully functioning IR remote with an Arduino. Unfortunately, after the connection was made using the remote, the monitor started to recognize the desktop and the remote was no longer needed…
If you want to learn about IR, I recommend starting with this video. The video explains the characteristics of IR and its implementations through an example project which I found extremely informative.